

Hi, friends! Thanks so much for stopping by for another dose of Thankful and Grateful! Today we have a super quick, easy card. This is perfect if you have to make a quick card or if you are a just getting into card making. Always remember that you could easily change the background stamp and use whichever background stamps you have on hand. This is the same for the sentiment. I have most items linked below for your convenience. Now, let’s create this card!

- Cut a card base from heavyweight cardstock to 4.25in x 5.5in top-folding card.
- Cut a panel to 4.25in x 5.5in from black cardstock to cover the front of the base.
- Gently rub antistatic powder over card panel to prepare it for embossing.
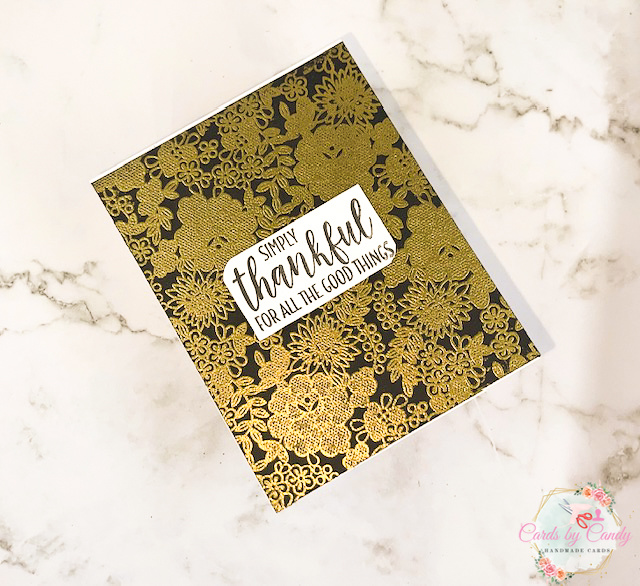
- Ink the background stamp using Versamark or another Embossing ink. For my background stamp I used “Something Lacy” by Stampin’ Up! (I think this may be retired now.) – but any background stamp will do.
- Stamp the background image onto the card panel. If you are a new card maker, a tip is that you may or may not see the watermarked image from the clear ink. No worries as you will see it when adding embossing powder.
- Pour gold embossing powder (or any color you choose) over the stamped image. You should see the powder catch on the inked portions. I use a coffee filter or a piece of thin paper to catch the excess to pour back into the vile.
- Using a heat tool, heat set until embossing powder melts. Make sure to not overheat the image. Set panel to the side to cool.
- Using a strong adhesive, I use Bearly Art Permanent Glue, adhere this panel to the front of the card base.
- Stamp your sentiment onto white cardstock in black ink. I used the “Simply Thankful…” sentiment from the Country Home stamp set by Stampin’ Up!.
- Cut out the sentiment into a rectangle shape. Then, cut extra pieces of the same size rectangle.
- Glue the extra rectangle pieces to the back of the stamped rectangle piece. This gives dimension and sturdiness.
- Round two opposing corners of the sentiment. I used my envelope maker to round my corners, but a corner rounder works great too.
- Add a thin strip of foam dimensional tape to the back of the sentiment piece. This will add more dimension to pop up your sentiment.
- Remove the release paper on the foam tape and place the sentiment in the middle of the card.
- Your card is complete! You could add gems or embellishments, but I decided not to since my background was already quite busy.
Please let me know what types of cards you plan to create with this simple technique. I would love to know what inspires you from your collection of stamps.


Below are the products used. Thank you so much for stopping by today!
Leave a Reply