


Hello! Welcome back to my card making blog! Creating one card at a time to send smiles to others. Today I’m featuring a simple card that won’t create a lot of bulk when mailing. This is perfect for a guy thank you card. I know typically I make ones with tons of flowers and when I need one for a guy, I don’t always have these readily available.
I’m a huge fan of majestic mountains, peaceful rivers, and gorgeous harvest moon starry nights. I find myself in complete awe of harvest moons. Especially when they are so large it feels like you could touch it. It’s hard to take my gaze away from its beauty and the sparkling stars against a mountain backdrop. This is my perfect vacation! Don’t get me wrong, beaches are nice, but there is something special about mountains and starry nights.
Let’s get into how I made this simple card!


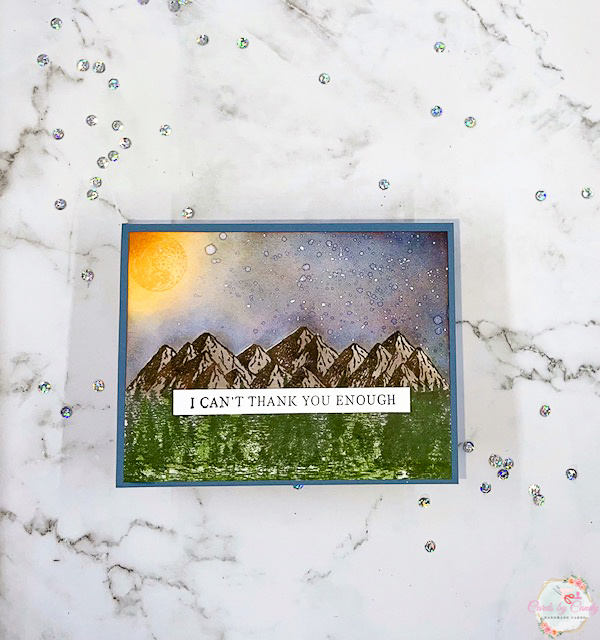
When you look a a gorgeous night, you will find hues of pinks, purples, yellows, deep blues, and white. To mimic a setting sky in which the moon has already risen, I began by placing a mask of the mountains using Gina K Masking Magic on my card panel and went over the top of the mountains using Stamping Up! Flirty Flamingo ink. This created the pink underlay. next, I went over the moon part using Altenew Sunkissed, Peach Perfect, Autumn Blaze, Firebrick, and a small spot of Red Jasper inks. I blended these over the spot where I wanted my moon. Using Stampin‘ Up! So Saffron ink and the Mountain Air stamp set, I stamped the moon in its perch above where I would place the mountain scene.
Next, I began working on the deep blue hues of the sky. Using a blending brush, I blended Stampin’ Up! Dapper Denim ink over the pink base. Then, I blended Night of Navy ink over it. I used a few passes of the Night of Navy ink over the far right corner opposite the moon. Having the base in the pink helped to create a purple hue as I blended the dapper denim and night of navy over it. Once I was satisfied with the sky, I lifted the mountain mask to begin working on the mountains.

The Stampin’ Up! Mountain Air set includes a two-stamp mountain part. One stamp will color in the mountains, while the second layer gives the grooves and the ridges. For the inks, I used Altenew Mocha Ink and for the deep grooves, I used Stampin’ Up! Early Espresso ink. After my mountains dried, I placed the mask over it again to work on my tree line. The trees came from the same Mountain Air stamp set. I went over it in Altenew Evergreen Inks stamping repeatedly as well as Altenew Green Onyx and Stampin’ Up! Garden Green ink. I alternated the trees to create more depth of a forest look in it. Once the forest dried, I used a small paintbrush and white pigment ink mixed with a few spritz of water and then splattered it over the night sky. These splatters created my stars.

To finish the card, I adhered it to a denim blue cardstock base. I stamped the sentiment using Hampton Art Thanks Stamps onto a thin strip of cardstock. Then, cutting three more thin strips, I glued these to the back of the sentiment strip to create light dimension and adhered it just below the mountain line. This card really was simple to make. Perfect for a nature theme!
Let me know in the comments what you think or other stamps you have on hand.